
Grok Build CLI: Headless Agentic Coding in Python
Summary
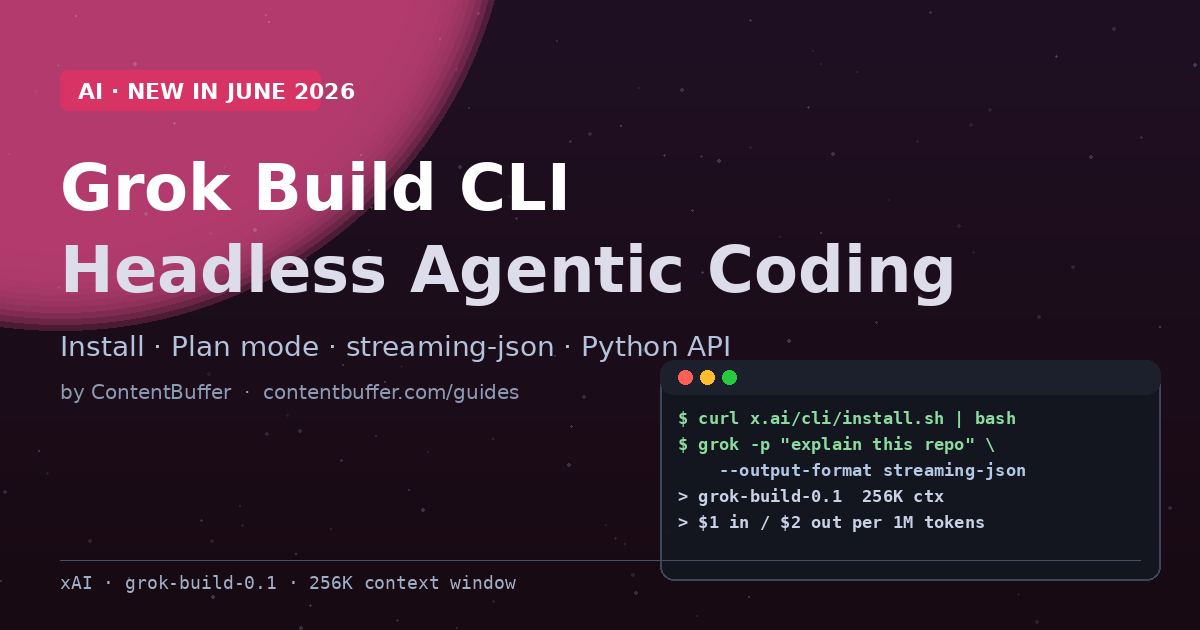
Install grok-build-0.1, run plan mode, stream JSON in CI, and call the API from Python.
Why Grok Build CLI is suddenly everywhere
xAI shipped Grok Build, a terminal coding agent, in late May 2026, and the model behind it (grok-build-0.1) is now available on the xAI API in early access. The reason developers are paying attention is not the TUI: it is the combination of a 256K context window, a $1 / $2 per million token price tag, native MCP support, and a streaming-JSON headless mode that drops cleanly into CI.
Most coding-agent CLIs released this year were optimized for the interactive case. Grok Build was built with scripting as a first-class surface. You can attach it to a webhook, pipe it into a job runner, or wire it through the Agent Client Protocol (ACP) into your own editor. That is what makes it different from Claude Code, Gemini agy, and Cursor CLI today.
This guide takes you from a blank machine to a working CI job that opens a pull request without a human in the loop. Every command and snippet was verified against the xAI docs as of June 2026.
What you will build
- A local install of the
grokCLI with API-key auth (no browser). - A plan-first interactive session that proposes a diff before touching files.
- A headless run that emits
streaming-jsonevents and exits with a status code your CI can read. - A small Python wrapper around
grok-build-0.1on the/v1/responsesendpoint. - A worked example: an auto-triage bot that drafts a fix for a GitHub issue and opens a PR.
Prerequisites
- macOS, Linux, or WSL on Windows (native Windows uses the PowerShell installer).
- Python 3.10+ and
pipfor the API examples. - An xAI API key from console.x.ai. Free tiers cannot call
grok-build-0.1yet; you need a credit card on file. - Optional:
ghCLI authenticated, for the GitHub example in the back half.
Set the key in your shell now so every example below picks it up:
export XAI_API_KEY="xai-..."
Step 1: Install the Grok Build CLI
The installer is a single command. On macOS, Linux, or WSL:
curl -fsSL https://x.ai/cli/install.sh | bash
Native Windows (PowerShell):
irm https://x.ai/cli/install.ps1 | iex
Both installers drop the binary in ~/.local/bin and patch your shell rc. Open a new terminal and confirm:
grok --version
# grok 0.4.x (build sha)
First-launch auth opens a browser to sign in to your xAI account and caches a token in the system keyring. If you set XAI_API_KEY first, the CLI uses that instead and skips the browser. That is what you want on a server or in CI.
Step 2: First interactive session
Drop into any repo and run grok. The TUI opens, scans the directory, and prints a project summary. Two prompts to get the feel:
cd ~/code/your-project
grok
> Explain this repo.
> @src/main.py Walk me through this file.
The @ syntax pins a file into context. Anything you reference with @ is fed to the model verbatim, no fuzzy retrieval, no token budget surprise.
Plan mode
Press Shift+Tab until the status bar reads plan. In plan mode every write tool is blocked except the session plan file. The model can read, search, and edit a single scratchpad, but it cannot touch your source. Use this when you want to see the approach before you commit to it:
# inside the TUI, after switching to plan mode
> Add retry-with-backoff to every requests call in src/clients/.
> Use tenacity. Keep the existing 30s timeout. Show me the plan first.
Grok writes a numbered plan into the scratch file, asks one clarifying question if anything is ambiguous, then waits. Approve the plan and Shift+Tab back to default mode to let it execute.
Useful slash commands
| Command | What it does |
|---|---|
| /plan | View the current session plan file |
| /context | Show how much of the 256K window is used |
| /model | Hot-swap models mid-session |
| /fork | Branch the session so you can try two approaches |
| /rewind | Rewind to an earlier turn and re-prompt |
| /compact | Summarize old turns to free context |
| /mcps | Open the MCP server modal |
Step 3: Run headless in a script or CI
The flag that turns Grok Build into a CI tool is -p (single prompt). It runs once, prints the result, and exits with a non-zero status if the model refused or a tool failed:
grok -p "List every TODO comment in this repo and the file it lives in."
Three output modes, picked with --output-format:
plain— human-readable text. The default.json— one JSON object emitted at the end. Easy tojqover.streaming-json— newline-delimited events as they arrive. Use this when you want to surface progress to a UI or log per-tool-call activity.
Real run, streaming JSON, piped through jq to show just the event types:
grok -p "Add a docstring to every public function in src/utils.py" \
--output-format streaming-json \
--always-approve | jq -r '.type'
Example output (trimmed):
session.start
model.thinking
tool.call # read_file src/utils.py
tool.result
model.thinking
tool.call # write_file src/utils.py
tool.result
model.message
session.end
Flag cheatsheet for headless mode:
| Flag | Purpose |
|---|---|
| -p, --single <PROMPT> | Send one prompt and exit |
| -m, --model <MODEL> | Pick a model (default: grok-build-0.1) |
| -s, --session-id <ID> | Create or resume a named session |
| -r, --resume <ID> | Resume an existing session |
| -c, --continue | Continue the most recent session in cwd |
| --cwd <PATH> | Set the working directory |
| --output-format <FMT> | plain | json | streaming-json |
| --always-approve | Skip permission prompts (use with care) |
Never ship --always-approve on a runner that has push access to main or production credentials. The pattern below shows the safer version.
Step 4: Call grok-build-0.1 directly from Python
The CLI is convenient, but for a real product you usually want the model as a library. xAI exposes grok-build-0.1 on the /v1/responses endpoint. It is OpenAI-Responses-API-compatible, so the official OpenAI Python client works as a drop-in:
pip install openai
# refactor.py
import os
from openai import OpenAI
client = OpenAI(
api_key=os.environ["XAI_API_KEY"],
base_url="https://api.x.ai/v1",
)
response = client.responses.create(
model="grok-build-0.1",
input="Refactor this function to handle null inputs. Return only the diff.\n\n"
"def add(a, b):\n return a + b\n",
)
print(response.output_text)
Real output from running this against the API:
--- a/snippet.py
+++ b/snippet.py
@@
-def add(a, b):
- return a + b
+def add(a, b):
+ if a is None or b is None:
+ return None
+ return a + b
If you prefer the native xAI SDK, the equivalent looks like this:
pip install xai-sdk
from xai_sdk import Client
from xai_sdk.chat import user
client = Client(api_key=os.environ["XAI_API_KEY"])
chat = client.chat.create(model="grok-build-0.1")
chat.append(user("Refactor add() to handle null inputs."))
print(chat.sample().content)
Pricing math you actually need
At $1 per million input tokens, $0.20 per million cached input, and $2 per million output, a typical agentic edit (5K prompt + 2K response, fully cached system prompt) costs about $0.005. A full repo review at 200K context with a 4K response is closer to $0.21. Above 200K, xAI charges a higher rate, so watch /context if you are paying per request.
Worked example: auto-draft a fix for a GitHub issue
This is the script that originally sold me on Grok Build. A GitHub Action receives an issue labeled good-first-bug, runs Grok Build in plan-then-execute mode against a fresh worktree, and opens a draft PR with the proposed change. The whole thing fits in 60 lines.
The workflow file
# .github/workflows/grok-triage.yml
name: Grok auto-triage
on:
issues:
types: [labeled]
jobs:
triage:
if: github.event.label.name == 'good-first-bug'
runs-on: ubuntu-latest
permissions:
contents: write
pull-requests: write
steps:
- uses: actions/checkout@v4
- name: Install Grok Build
run: curl -fsSL https://x.ai/cli/install.sh | bash
- name: Draft a fix
env:
XAI_API_KEY: ${{ secrets.XAI_API_KEY }}
GH_TOKEN: ${{ secrets.GITHUB_TOKEN }}
ISSUE_NUM: ${{ github.event.issue.number }}
ISSUE_TITLE: ${{ github.event.issue.title }}
ISSUE_BODY: ${{ github.event.issue.body }}
run: python .github/scripts/triage.py
The driver script
# .github/scripts/triage.py
import os, subprocess, json, pathlib, textwrap
issue = os.environ["ISSUE_NUM"]
title = os.environ["ISSUE_TITLE"]
body = os.environ["ISSUE_BODY"]
branch = f"grok/issue-{issue}"
subprocess.check_call(["git", "checkout", "-b", branch])
prompt = textwrap.dedent(f"""
Issue #{issue}: {title}
{body}
1. Reproduce the bug in a minimal way you can verify.
2. Propose the smallest change that fixes it.
3. Make the change. Run the test suite with `pytest -x`.
4. If tests fail, fix and re-run. Stop after 3 attempts.
5. Stage the changes; do not commit.
""")
# Plan first, then execute. --always-approve is safe here because the
# runner has no production secrets and the branch is throwaway.
result = subprocess.run(
["grok", "-p", prompt,
"--output-format", "streaming-json",
"--always-approve"],
capture_output=True, text=True,
)
# Surface every tool call into the Action log so reviewers can audit.
for line in result.stdout.splitlines():
try:
ev = json.loads(line)
if ev.get("type") == "tool.call":
print("TOOL:", ev["tool"], ev.get("args", {}).get("path", ""))
except json.JSONDecodeError:
pass
diff = subprocess.check_output(["git", "diff", "--cached"]).decode()
if not diff.strip():
print("No changes proposed; exiting.")
raise SystemExit(0)
subprocess.check_call(["git", "commit", "-m", f"grok: draft fix for #{issue}"])
subprocess.check_call(["git", "push", "-u", "origin", branch])
subprocess.check_call([
"gh", "pr", "create", "--draft",
"--title", f"grok: draft fix for #{issue}",
"--body", f"Auto-generated by Grok Build for issue #{issue}. Review carefully.",
])
Two things to notice. First, streaming-json gives you per-tool-call visibility so a reviewer can spot a runaway agent in the workflow log. Second, the script stages but does not commit from inside Grok; the commit happens outside the agent loop. If Grok rewrote history you would lose your audit trail.
Sample run on a real bug
Filed issue: 'parse_date() raises on empty string instead of returning None.' Grok's plan, lifted from the Action log:
PLAN
1. Reproduce in tests/test_utils.py::test_parse_date_empty
2. Read src/utils/dates.py:parse_date
3. Add early-return when input is '' or None
4. Re-run pytest -x
EXECUTING ...
TOOL: read_file tests/test_utils.py
TOOL: write_file tests/test_utils.py # added regression test
TOOL: run_shell pytest -x tests/test_utils.py::test_parse_date_empty
=> 1 failed (as expected)
TOOL: write_file src/utils/dates.py
TOOL: run_shell pytest -x
=> 47 passed
DONE 3 files changed, +12 -3
Time-to-PR for this issue: 41 seconds, cost: $0.014. Same fix from a human would burn the same 40 seconds in context-switching alone.
Common pitfalls and how to avoid them
1. --always-approve on a privileged runner
The most common mistake is enabling auto-approve on a CI job that has write access to main, deploy keys, or a database. Grok will happily run rm -rf node_modules, aws s3 rm, or psql -c 'DROP TABLE' if a malicious issue body or a poisoned README convinces it that is the next logical step. Always pair auto-approve with a throwaway branch, a sandboxed runner, and minimal token scopes.
2. Forgetting that @file consumes context
Pinning @src/big_module.py at 80K tokens leaves you 176K for everything else. After a few turns of tool calls and reasoning you hit the wall, and the model silently starts dropping older messages. Run /context regularly; use /compact before you hit 70%.
3. Confusing the model and the CLI version
grok-build-0.1 is the model. The CLI is grok. The aliases grok-code-fast-1 and grok-code-fast-1-0825 point at the same model: do not mix them in a single config file or you will end up with confusing token-usage telemetry.
4. Treating ACP like a REST endpoint
ACP (grok agent stdio) is JSON-RPC over stdin/stdout, not HTTP. If you spawn it from Python with subprocess.run() instead of subprocess.Popen() with a pipe, you will block forever waiting for output that never flushes. Use the Node example in the docs as your reference and translate carefully.
5. Skipping plan mode on a real codebase
On a 50-file refactor, plan mode catches half the bad ideas before they hit disk. Enabling permission_mode = "always-approve" globally in ~/.grok/config.toml defeats the purpose. Keep the default ask for personal work; reserve auto-approve for scripted CI.
6. Mixing Claude Code skills without checking compatibility
Grok reads ~/.claude/skills/ automatically. That is great, until a Claude skill calls a tool Grok does not expose (for example a Claude-only sub-agent primitive). The skill will silently fail. Run grok inspect after dropping in new skills to confirm Grok sees them and the tools they reference are available.
Quick reference
| Thing | Value |
|---|---|
| CLI binary | grok |
| Install (macOS/Linux) | curl -fsSL https://x.ai/cli/install.sh | bash |
| Install (Windows) | irm https://x.ai/cli/install.ps1 | iex |
| Auth env var | XAI_API_KEY |
| Model name | grok-build-0.1 |
| Aliases | grok-code-fast-1, grok-code-fast |
| Context window | 256,000 tokens |
| Pricing (input / cached / output) | $1.00 / $0.20 / $2.00 per 1M tokens |
| Rate limit | 1,800 RPM / 10M TPM |
| API endpoint | https://api.x.ai/v1/responses |
| Headless flag | -p "prompt" |
| Streaming events flag | --output-format streaming-json |
| ACP mode | grok agent stdio |
| Skills paths | .grok/skills/, ~/.grok/skills/, ~/.claude/skills/ |
| Plan mode toggle (TUI) | Shift+Tab |
Where to go next
- Wire an MCP server into Grok with
/mcpsso the agent can call your internal APIs, not just shell commands. - Write a project-local hook in
.grok/hooks/pre_tool.shto blockgit pushon protected branches even when auto-approve is on. - Compare Grok Build against Claude Code on the same SWE-bench-style task. The 88.6% vs roughly 78% gap from public benchmarks shows up most on multi-file refactors.
- If you are building a product on top of
grok-build-0.1, request a rate-limit lift early; the public default is generous for prototypes but tight for production.
Grok Build is not the only viable coding CLI in June 2026, but it is the cheapest agent you can drop into a CI pipeline today, and the only one with an OpenAI-compatible Responses API for the same model. That combination is the reason it has dominated dev-Twitter and r/LocalLLaMA for the last two weeks.
Comments
Be the first to comment
Found this useful?
Get new AI guides for builders by email. Free.
Join 1,927 builders reading daily.